

1. Create a new survey
A hands-on, end-to-end walkthrough of the Smartinterview builder. By the end of this document, you will know how to:- Create a survey from scratch or import one from an existing PDF / DOCX
- Design every type of question the platform supports
- Add AI-driven conversational (smartquestion) blocks with follow-ups
- Localise question text and navigation buttons into any of 10 languages
- Configure display conditions and URL variables
- Test the survey in three different ways before sharing it
- Generate synthetic test data
- Visualise responses in the Data tab
- Export raw data to Excel, CSV, or JSON
- Deploy and share the survey (direct link or embedded iframe)
1. Creating a survey
From the dashboard, click + New survey. You are dropped into the builder with:- An empty questions list
- A default
End Screenalready wired at the bottom - The “No created questions yet” empty state in the centre panel, showing two buttons: + Create question and Import a file
1a. Create questions from scratch
- Click + Create question.
- A new question appears in the list (named
Q1) and the editor opens. - Type the question title directly in the centre canvas.
- Click + Create question.
- A new question appears in the list (named
Q1) and the editor opens. - Type the question title directly in the centre canvas.
1b. Import an existing questionnaire (PDF / DOCX)
If you already have a questionnaire written, you do not need to re-type it.- Click Import a file in the empty state (or + Add question then “Import” if you already have other questions).
- Drag-and-drop or choose a
.pdfor.docxfile (max 25 MB). - Click Importer and wait for the “Importation en cours…” toast.
- When the import finishes, every question the LLM detected appears in the builder with the right type already selected:
- Skip-logic conditions and min/max ranges are preserved when they’re explicitly stated in the source document.
Tip: the import uses AI. For complicated layouts it’s worth opening each question afterwards and verifying both the title and the control type match what you expected.
2. The builder at a glance
 Once you create a survey you land on the builder. The interface has three main regions:
- Header — a single
Settingstoggle on the left and a four-button segmented toggle for the builder modes.Deployopens a pop-up with the shareable links; it is not a tab. - Center panel — everything you design or preview for the currently selected question. Its content changes with the mode selected in the header.
- Right panel — the question list, the controls palette (expert mode only), and the Endings list (welcome/end screens).
- When you click Data, the Questions panel auto-collapses to give the response table room to breathe.
3. Writing the question title
Click anywhere in the large title area and start typing. Smartinterview uses a Notion-like WYSIWYG editor with a floating bubble toolbar that appears when you select text: Click anywhere in the large title area and start typing. Smartinterview uses a Notion-like WYSIWYG editor with a floating bubble toolbar that appears when you select text:
The editor accepts inline images (drag-and-drop or paste a URL) and supports keyboard shortcuts for bold/italic/underline (
⌘B, ⌘I, ⌘U).
4. Translating a question (10 languages)
Smartinterview stores a primary language per question and any number of translations alongside it. Smartinterview stores a primary language per question and any number of translations alongside it.- Write the question in whatever language feels most natural — this becomes the primary language.
- Select any portion of the question title so the bubble toolbar appears.
- Click the 🌐 icon on the far right of the toolbar.
- A hover menu lists every supported language:
- Français (FR) ★ principale
- English (EN)
- Deutsch (DE)
- Español (ES)
- العربية (AR)
- हिन्दी (HI)
- Português (PT)
- Português (BR)
- ไทย (TH)
- 中文 (ZH)
- 日本語 (JA)
- Français (FR) ★ principale
- English (EN)
- Deutsch (DE)
- Español (ES)
- العربية (AR)
- हिन्दी (HI)
- Português (PT)
- Português (BR)
- ไทย (TH)
- 中文 (ZH)
- 日本語 (JA)
- Click the target language. Smartinterview calls the translation API and writes the result to
uischema.options.translations[<lang>]. - The editor view automatically switches to the newly-translated version so you can verify and fine-tune it inline.
- Click the 🌐 icon again and pick
★ principaleto go back to the original — no second API call. - Click the target language. Smartinterview calls the translation API and writes the result to
uischema.options.translations[<lang>]. - The editor view automatically switches to the newly-translated version so you can verify and fine-tune it inline.
- Click the 🌐 icon again and pick
★ principaleto go back to the original — no second API call.
/fr/…, /en/…, /de/…, etc). If a translation isn’t set for their locale, they fall back to the primary language.
5. Adding answer blocks
Every question can contain one or more answer blocks. In expert mode the full palette is visible on the right. In simple mode only the most common blocks are shown to keep the UI approachable.5a. The full block catalogue
5b. Adding a block
- Pick a question in the right-hand list.
- Click any block in the Controls palette. It’s inserted at the bottom of the current question.
- Hover over the new block — a toolbar appears on the top-right corner with a pencil (edit) and a trash (delete) icon.
- Click the pencil to open the edit popover where you can:
- Change the block type (within the same group)
- Rename the label
- Toggle
Required - See the internal response ID (e.g.
ctrl1)
- Click the trash to delete the block.
5c. Matrix blocks (Checkbox Table & Open Text Table)
Both matrix blocks open with a default 2 rows × 3 columns grid and an inline editor bar:- + Row / + Column — grow the matrix. New rows get a fresh property key on the schema so answers stay separated.
- R:/C: chips — click any chip to rename the row or column inline. Hit Enter to commit, Escape to revert.
- × on hover — delete a row or column (the last one is protected so the matrix is never empty).
5d. Smartquestion (AI conversational block)
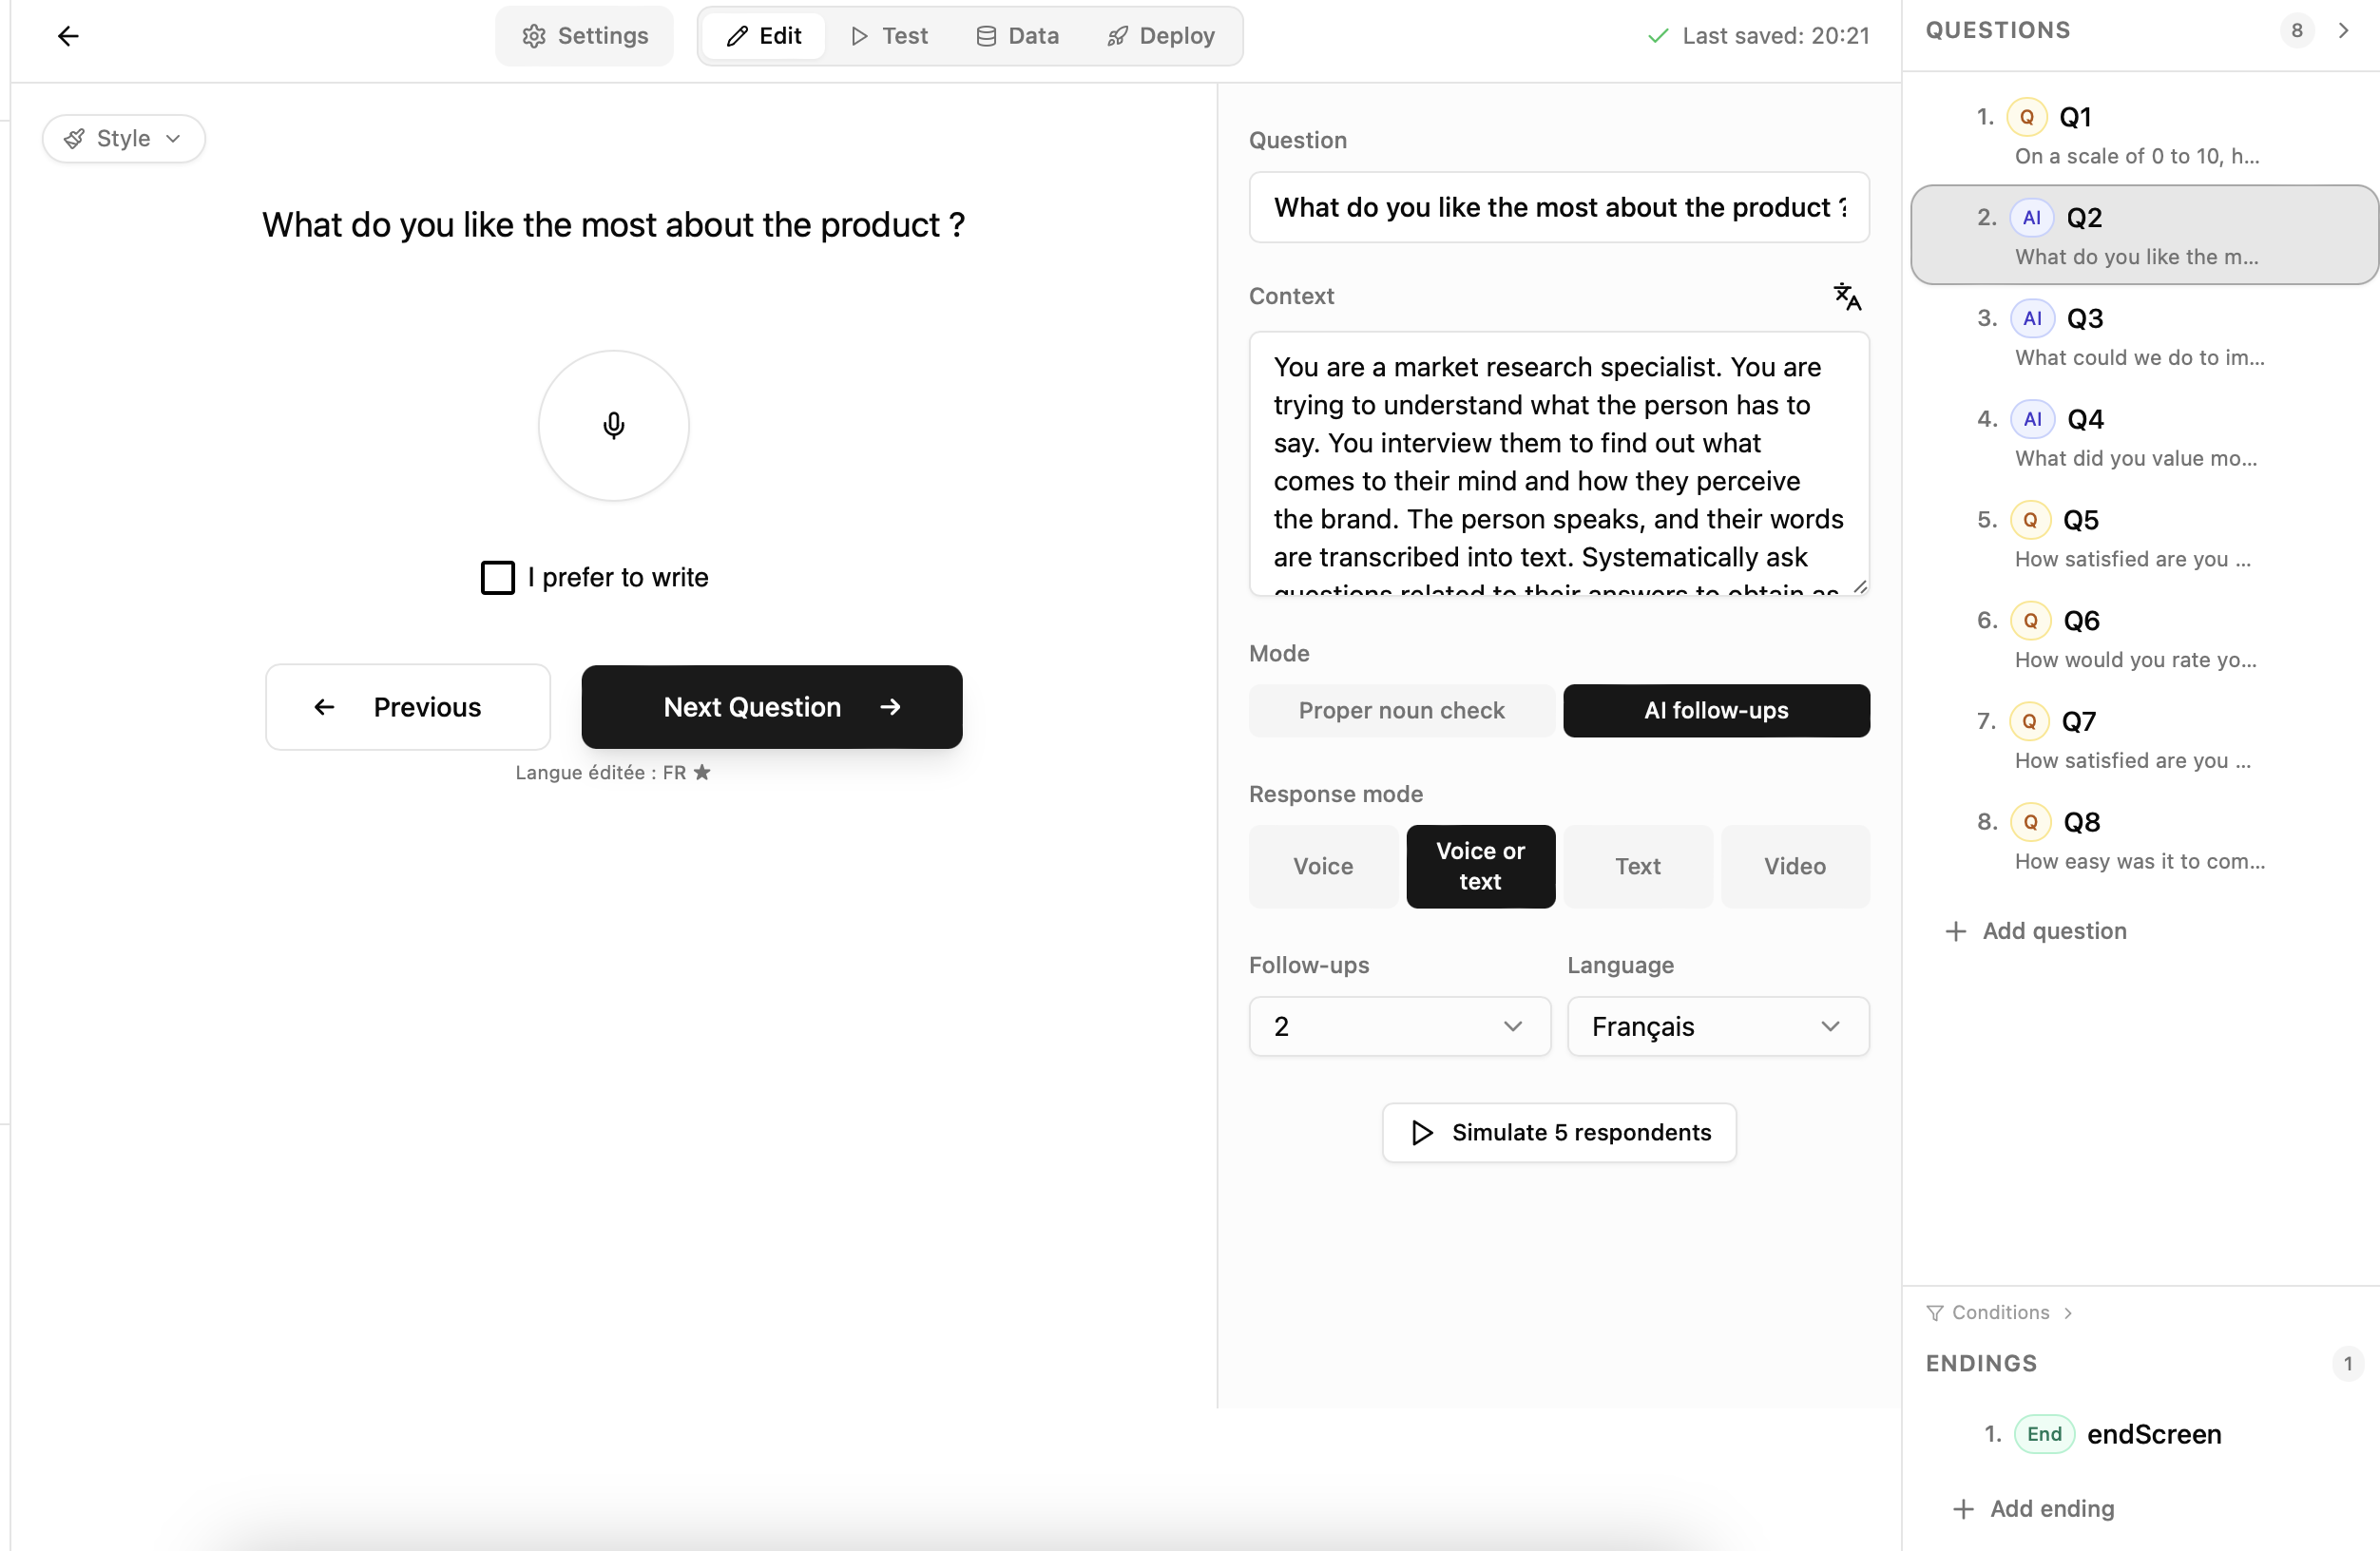
Adding a smartquestion converts the question into an AI-driven interview. Respondents see:- A large circular microphone button in the middle of the screen
- A small “I prefer to write” checkbox under it
- Question — the visible prompt (mirrors the question title)
- Contexte — the persona / instructions passed to the AI (e.g. “You are a market research specialist investigating brand perception…”). This is what steers the follow-ups.
- Mode — optional tags (Vérification noms propres, Relances AI)
- Mode de réponse
- Vocale — voice only
- Vocale ou texte — voice with a “I prefer to write” fallback (default)
- Texte — text only
- Vidéo — video recording
- Relances — number of AI follow-ups, 1 to 4 (default 2)
- Langue — the interview language, or
None (user locale)to auto-match
6. Editing navigation buttons (Next / Previous)
Below every question preview, the builder shows a Next Question button (and a Previous button when the question is not the first in the order). Both labels are click-to-edit:- Click directly on the label.
- Type your replacement text.
- Hit Enter to commit (or click outside). Escape cancels.
uischema.options.navigation.{nextLabel, previousLabel} and respondents see them exactly as written. If you leave a label empty it falls back to the locale-wide default (Next Question in English, Question suivante in French, etc.).
7. Display conditions (skip logic)
Click Conditions at the bottom of the right panel to configure when a question is shown. You can chain rules like:==, !=, >, <, >=, <=. Imported questionnaires preserve any conditions the original document expressed.
8. Paramètres tab
Click Paramètres in the header to jump to survey-level settings:8a. Variables URL
Define named variables that can be passed via the survey URL (?gender=F&age=25) and referenced in display conditions or the End Screen return URL template. Each variable has a name, a type (text, number, boolean, object), and an optional default value.
8b. Expert features
A single toggle that enables the full expert palette, the expert smartquestion editor, and the Preview / Widget tabs. Keep it off for authors who only need the simple-mode blocks.9. Testing the survey
There are three complementary ways to QA a survey before sharing it.9a. Test mode (inside the builder)
Click the Test button in the header’s mode toggle. The currently selected question renders exactly as a respondent sees it, with a working Next Question button that navigates the whole flow. The end screen, the welcome screen, and any smartquestion follow-ups all fire normally. Test mode is perfect for checking styling, slider defaults, matrix layouts, and the mic interaction without any network latency.9b. Deploy → Test link
Click Deploy in the header. A small pop-up lists one direct link per supported locale:
?user_id=test_<random>. Because each test_<random> is treated as a brand-new respondent, you can:
- Take the same survey multiple times from the same browser
- Skip the “already completed” end-screen cache that real respondents would see on a repeat visit
- Separate QA answers from real ones later (all
user_idvalues starting withtest_are still written to the database but are easy to filter out)
user_id is generated — copy the link, take the survey, toggle off and back on for the next run.
Warning: a link without?user_id=remembers completion inlocalStorage. If you take a real link twice in the same browser the second visit lands directly on the end screen. Always use Mode test during QA.
9c. Generating synthetic test data
Once you have a test link, 2–3 runs is usually enough to light up every question in the Data tab:- Open the link in an Incognito / Private window to avoid cookie bleed.
- Fill only the required fields (red asterisk). Optional fields can be skipped.
- On smartquestion blocks, type a short answer so the AI has something to follow up on. Two or three sentences produce a realistic Q/R thread.
- For each synthetic respondent, flip Mode test off and on in the Deploy dialog so you get a new
user_id, then copy the updated link.
10. Reviewing responses (Data tab)
Click Data in the header. The Questions panel collapses and the centre fills with a pivoted table: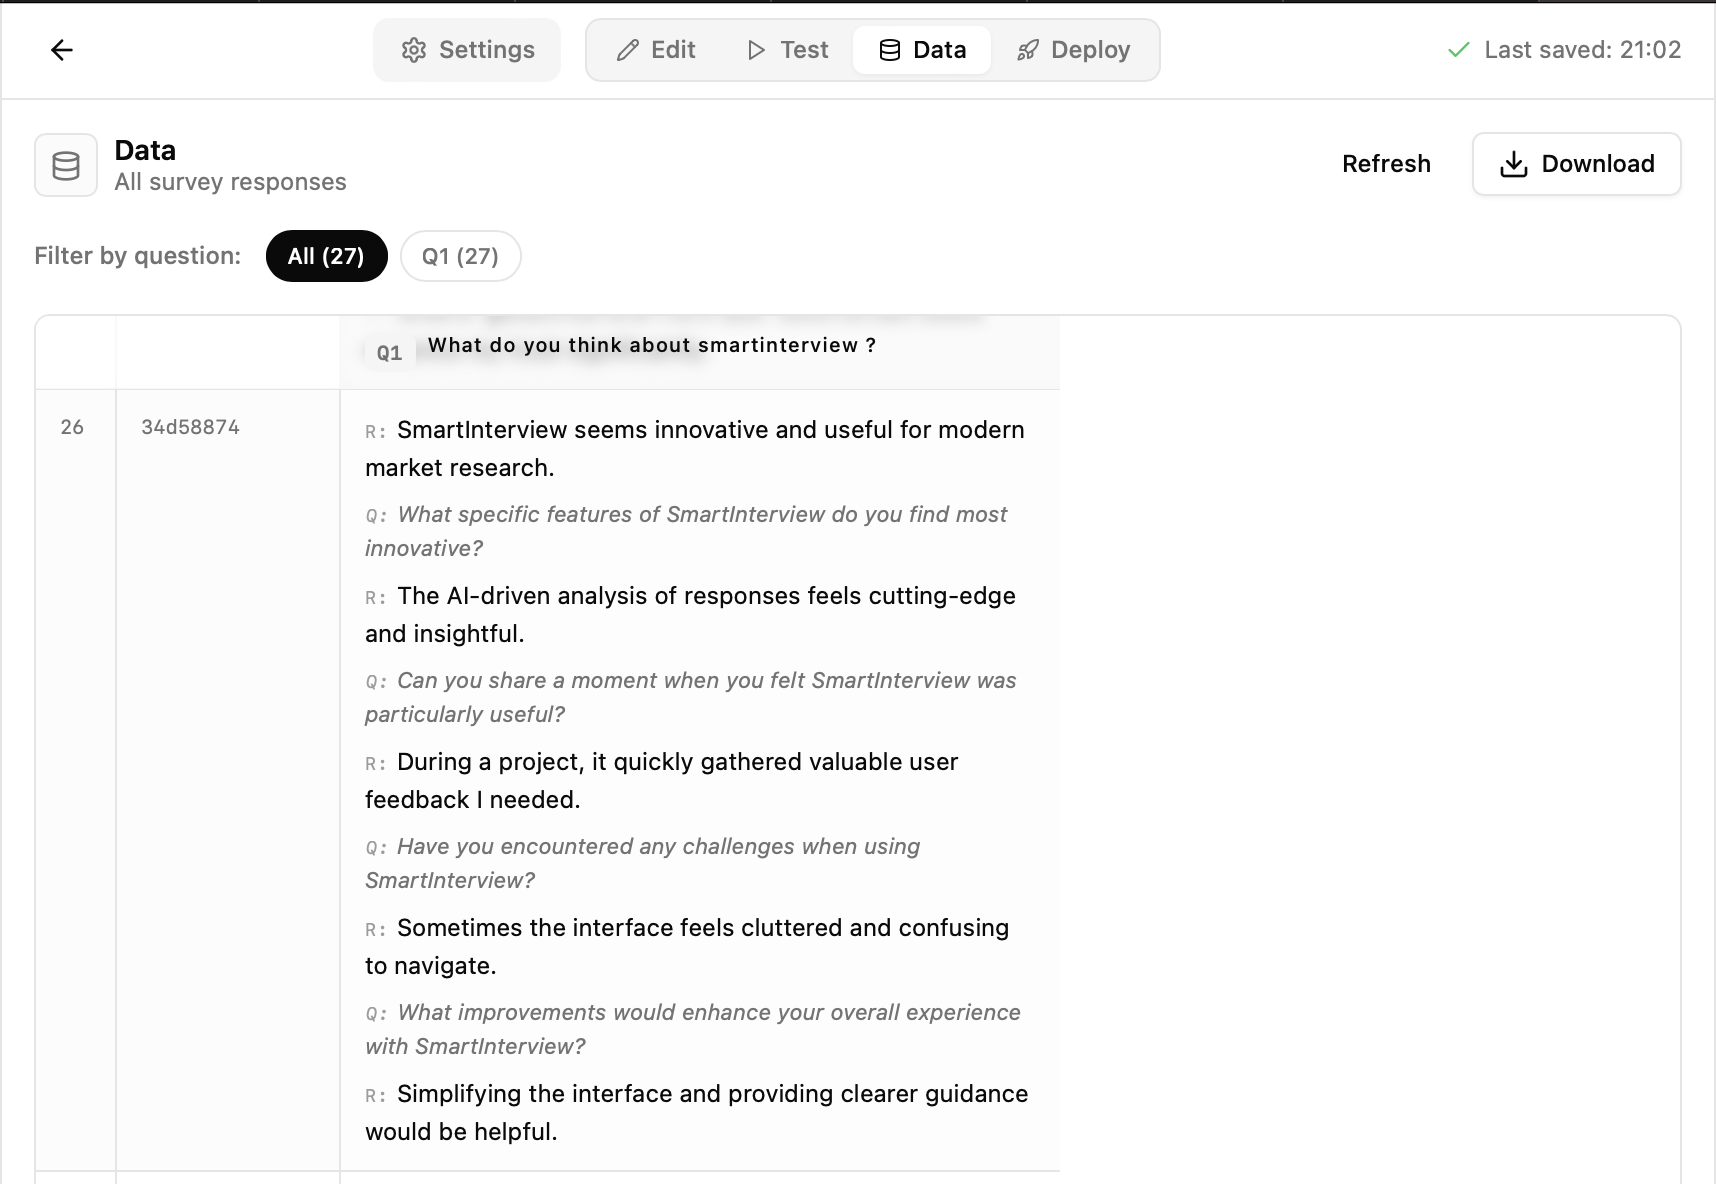
- One row per unique
user_id. - One column per non-special question, in builder order.
—marks a question the respondent didn’t reach or didn’t answer.- The first two columns (
#+Respondent) are sticky-left, so they stay pinned while you scroll horizontally through many questions.
10a. Filtering
Above the table, a chip bar lets you narrow the view:- All — show every question (default). The number is the respondent count.
- Qx — show only that one column. Other columns are hidden, rows remain.
10b. AI / smartquestion cells
For conversational questions, the cell renders the full Q/R conversation stacked inline:Q:). Respondent answers are in solid text (marked R:).
10c. Personas
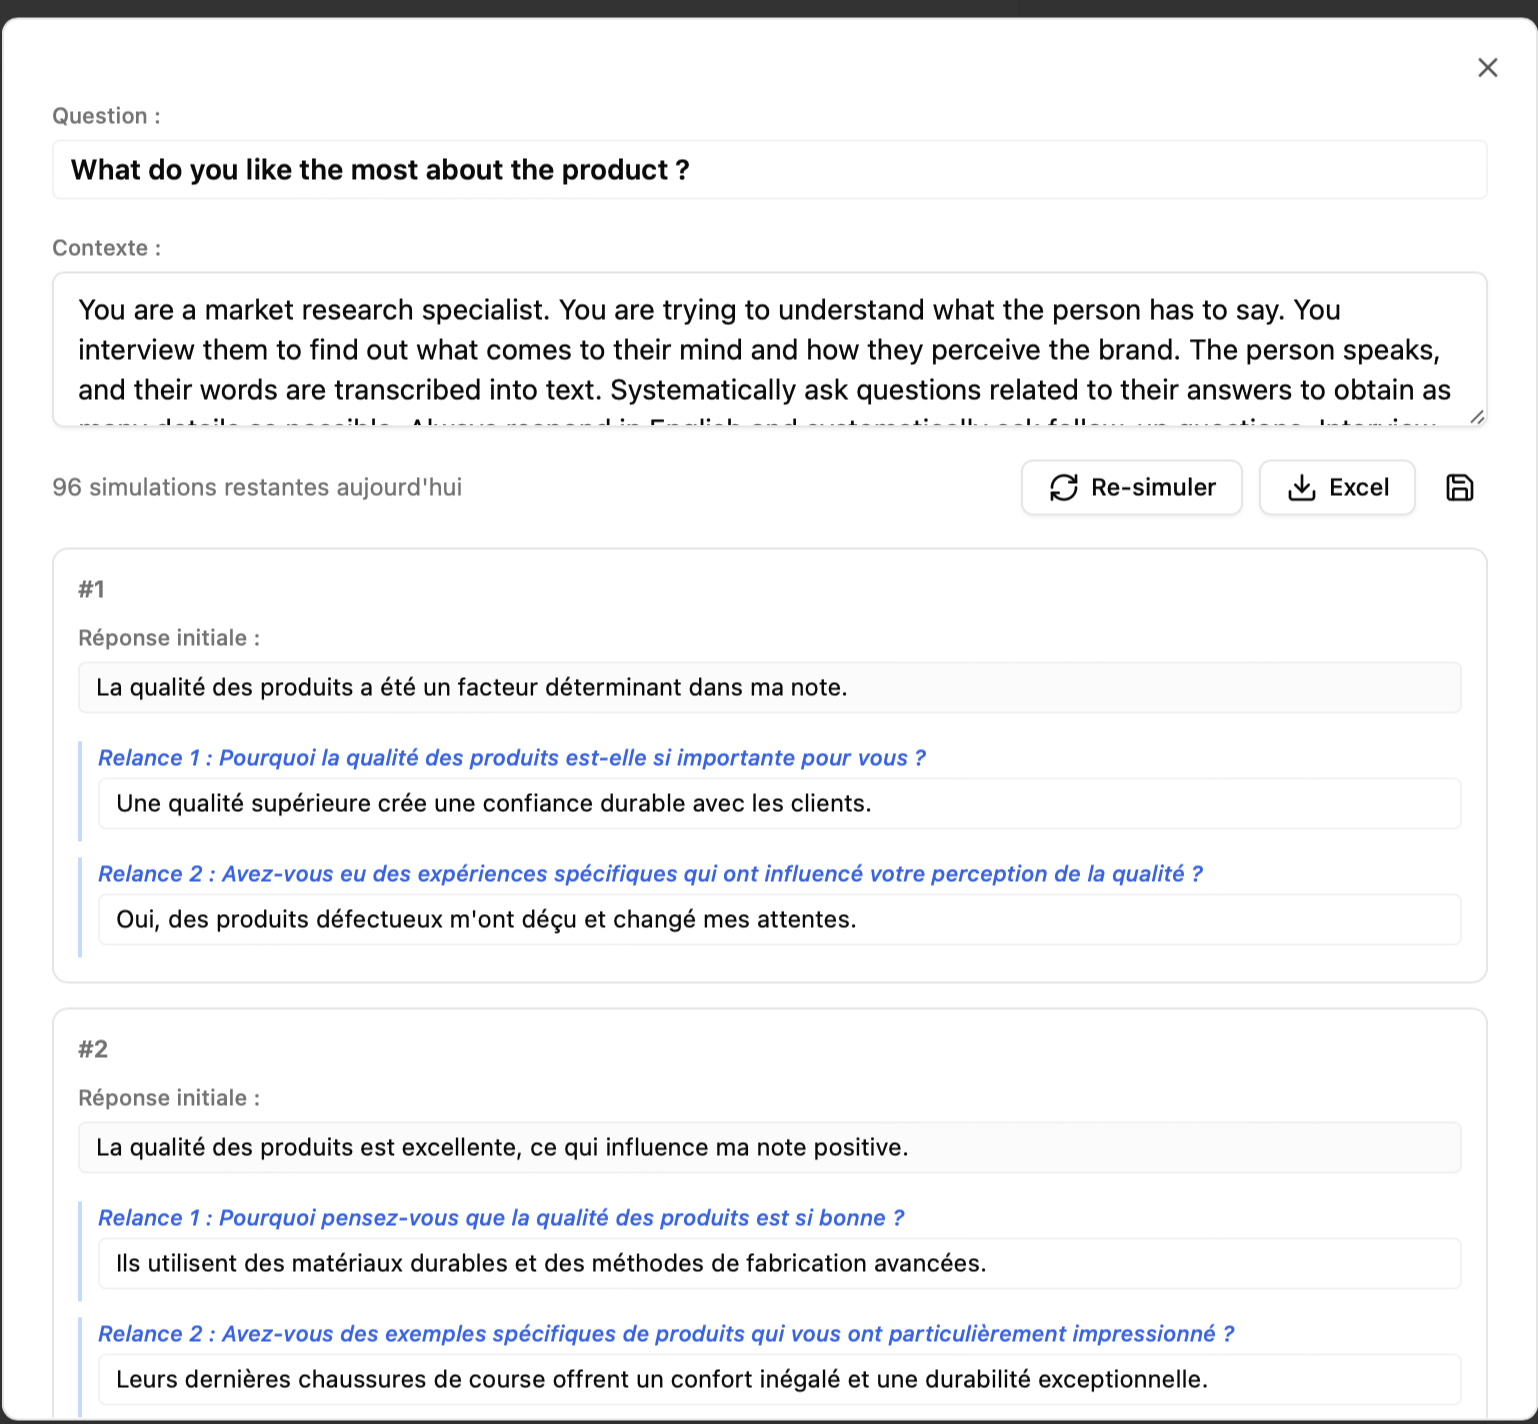
The Generate personas button creates scenarios to help anticipate the launch of an AI survey. Click the Save icon to store them so they appear in the dataset.
11. Exporting raw data
At the top-right of the Data tab, click Télécharger / Download for a dropdown of export formats:
Under the hood, the button calls:
12. Deploying & sharing
Once the survey is ready for real respondents:- Make sure every question has a meaningful title (and translations if your audience is multilingual).
- Click Deploy in the header.
- Copy the link for the locale you want to share. Note that the link starts with the locale path segment (
/fr/,/en/,/de/) — the survey UI (Next button text, end screen strings, error messages) auto-localises based on that segment. - Share the link on your own channel (email, panel provider, QR code, Slack…).
- Optionally append tracking parameters:
Any parameter declared under Paramètres → Variables URL becomes available inside display conditions and the End Screen return URL template.
Embedding in your own site (expert mode)
If you prefer to host the survey inside your own site:- Enable expert mode in Paramètres → Expert features.
- Switch to the Widget tab that appears.
- Customise width, height, and theme.
- Copy the generated
<iframe>snippet and paste it into your site. - The iframe posts a
smartinterview:completemessage to the parent window when the respondent finishes — use it to trigger any follow-up logic on your side.
13. Sharing / collaboration
- Invite teammates from the Inviter un membre button in the dashboard sidebar. Company members inherit RLS permissions and can edit every survey owned by the company.
- All builder edits are auto-saved two seconds after the last change; the header displays
Dernière sauvegarde : HH:mmso you always know the latest save time.